Tuesday, October 7, 2014

Artwork of a Wannabe Artist

So, shame on me, it's been a while since I've posted anything...like over a year.  But I have been busy, I'm now a mother of four and they are all under the age of five...so I'm pretty much running in every direction after them all day.  Even though I'm the crazy barefoot housewife I still find time now and then to do some painting.  Officially I'm a mixed media artist, meaning I use several different mediums to make my artwork, pastels, acrylics, collage, pen and ink and a number of other fun artist and crafters products.  So today I'm going to share a few of my projects.  I do also have several art journal layouts, but maybe I'll get to those next year.

The first thing that you should understand about the artwork I make is that I try not to express my feelings in my art, I can be in a pretty dark state of mind from time to time and I have no desire to be reminded of it, so I choose to paint things that make me happy.  Bright colorful things that remind me of spring or summer, paintings for my kids, things with quotes on them that I like etc.  Another things about my art is that I have two main styles, the first is a sort of abstract, higher end style that you might see on the walls of homes on interior design shows, the second is what I consider more like children's artwork, things you might find in a child's bedroom.  So here we go, I hope you enjoy.

 
This painting is currently untitled but was one of the first real paintings that I've made that turned out sort of the way I wanted.  I was watching a lot of the HGTV show "Colorsplash" with David Bromstead and he did a painting similar to this and I decided to try it.  I used a turkey baster to make the paint drip, it was a lot of fun and totally made a mess in my studio but it was worth it!

 
This is a horrible photo of this painting, the colors are more even in real life, I'm not much of a photographer, particularly since I take most photos with my iPhone but what are you going to do?  I originally painted this for my daughters room but I thought it was so cheery and fun that I decided to keep it in our Family room instead.  It's hard to tell but I adhered a layer of book pages and scrapbook paper to the background before painting it to give it some texture (I do this a lot with my artwork).  I had a sample of some texture paste and tried it out on the cherry blossoms and it worked pretty well to give more of a gradated color palette.  This painting is also untitled.

 
This piece is called "Ballerina" and I went very heavy on the collage.  I was able to get such a vibrant and translucent shade of blue for the dress by using pastels on my paper before sealing it with acrylic medium and adhering to the page.

 
This piece is called, "For the birds" originally I was going for a cheery group of birds hanging out on a power line or clothes line but they all ended up looking like crows and the whole things was kind of creepy.  I would have painted over it and made something else but so many family members and friends liked it that I decided to keep it.  Personally I think this painting is for the birds.

 
I have a lot of sketch books and notebooks laying around my house, if I were to just sit and draw in them I would no doubt get better at drawing, but I don't have the patience for it and most of my drawings turn out awful, I do much better when I get to use paint and other various artist implements, but every now and then I luck out and draw something that I like.  As I was flipping through an old notebook one day, looking for a blank page to make a list of something or other I came across this girl that I had drawn.  The body was horrible but the head looked okay so I gave her the Anne Boleyn treatment and cut off her head and pieced together a body out of scrap papers I had laying around.  I topped it off with a little tiny heart lace thing that I had acquired in my stash (my stash is quite extensive).  I finished this piece a couple years ago but it always reminded me of my late friend Jenny who lived up to this to a tee.  She will always be one of my heroes.

 
This painting is titled Butterflies, last year my mom talked me into helping her do a holiday bazaar...the bazaar was a joke, there were only a handful of venders shoved into a conference room that most people going in and out of the building didn't see and she only sold a couple things.  This was a piece I made for that show, it didn't sell, total bummer because this would look so cute in a little girls room!  So now it adorns the wall in my studio.  It wasn't a total loss because pictures like this make me happy, and being happy is what it's all about right?


This is an abstract titled "Poppies" which did actually make it into my kids bedroom.  I really love poppies, they have such delicate petals and are so vibrant.  This is one of the few paintings I planned out before pulling out the paintbrushes, it didn't turn out exactly the way I wanted but still okay.


This was an old plaque that had a picture on it I wasn't crazy about, so I painted over it and made this mangy looking owl (if you don't know about it yet, see my post about my owl obsession).  He's not my favorite owl I've ever made.  When I go to visit my niece and nephews in Idaho they always ask me to draw owls for them to color or paint so I normally whip one up that looks kind of like this.

That's all I have for now, I have a few more art pieces floating around here and there, if I think of any I may add to it, but here you go for now, I hope you enjoyed my artwork and style.


Wednesday, March 27, 2013

A Little Girl's Lampshade Skirt


So, I'm sort of a late night crafter most of the time because I have three kids three and under and they are BUSY!!  Which means I either have to herd them into a corner of my craft room with a project and hope they don't get paint all over whatever I'm working on or I can wait until they are snuggled into their beds and stay up until one in the morning crafting and lets face it, I'm a night owl!  So, this was what I created last night, and you will not believe what I used to make it!
Looking familiar?  A couple weeks ago I picked up this lamp shade for $1.50 at a thrift store because unlike some lamps it had the whole metal skelleton underneath (many of them will simply have the top and bottom ring and a very stiff material for the shade portion).  Anyways, I was planning on tearing off the fabric, adding some twinkle lights and birds and whatever else sounded good to make my daughter a night light for her room.  Well before I started I looked at all that perfect pleating and thought to myself, what a waste!  So what did I do?  I saved it!
 
So I started deconstruction, the inside went first so I could get a good look at the understructure and see if the fabric had been glued down to the center posts (that's what I'm calling them, if any of you know what they're called, good for you!).  It wasn't, the fabric they used was also some kind of polyester, cotton mix which made me think that this would work.  If it didn't pass the laundry test I figured it would be an interesting experiment at the very least.
 

I pulled it all off the rest of the way and discarded the frame until the next project. 
 
After trimming the glued portion at the bottom I had quite a bit less fabric than I anticipated, so I made the executive decision to use some leftover fabric from another project to add to the bottom.  I also needed to fix the top, it was also covered in glue.
To fix the top I ran a quick base stitch under the glue line to keep the pleats in place.
I trimmed the excess off the top, just be careful not to cut through your base stitch or you will be pinning everything like crazy.  Have I mentioned that I hate pinning?  Almost as much as ironing!  I know, I know, all of you seamstresses are cringing right now...you'll get over it though.
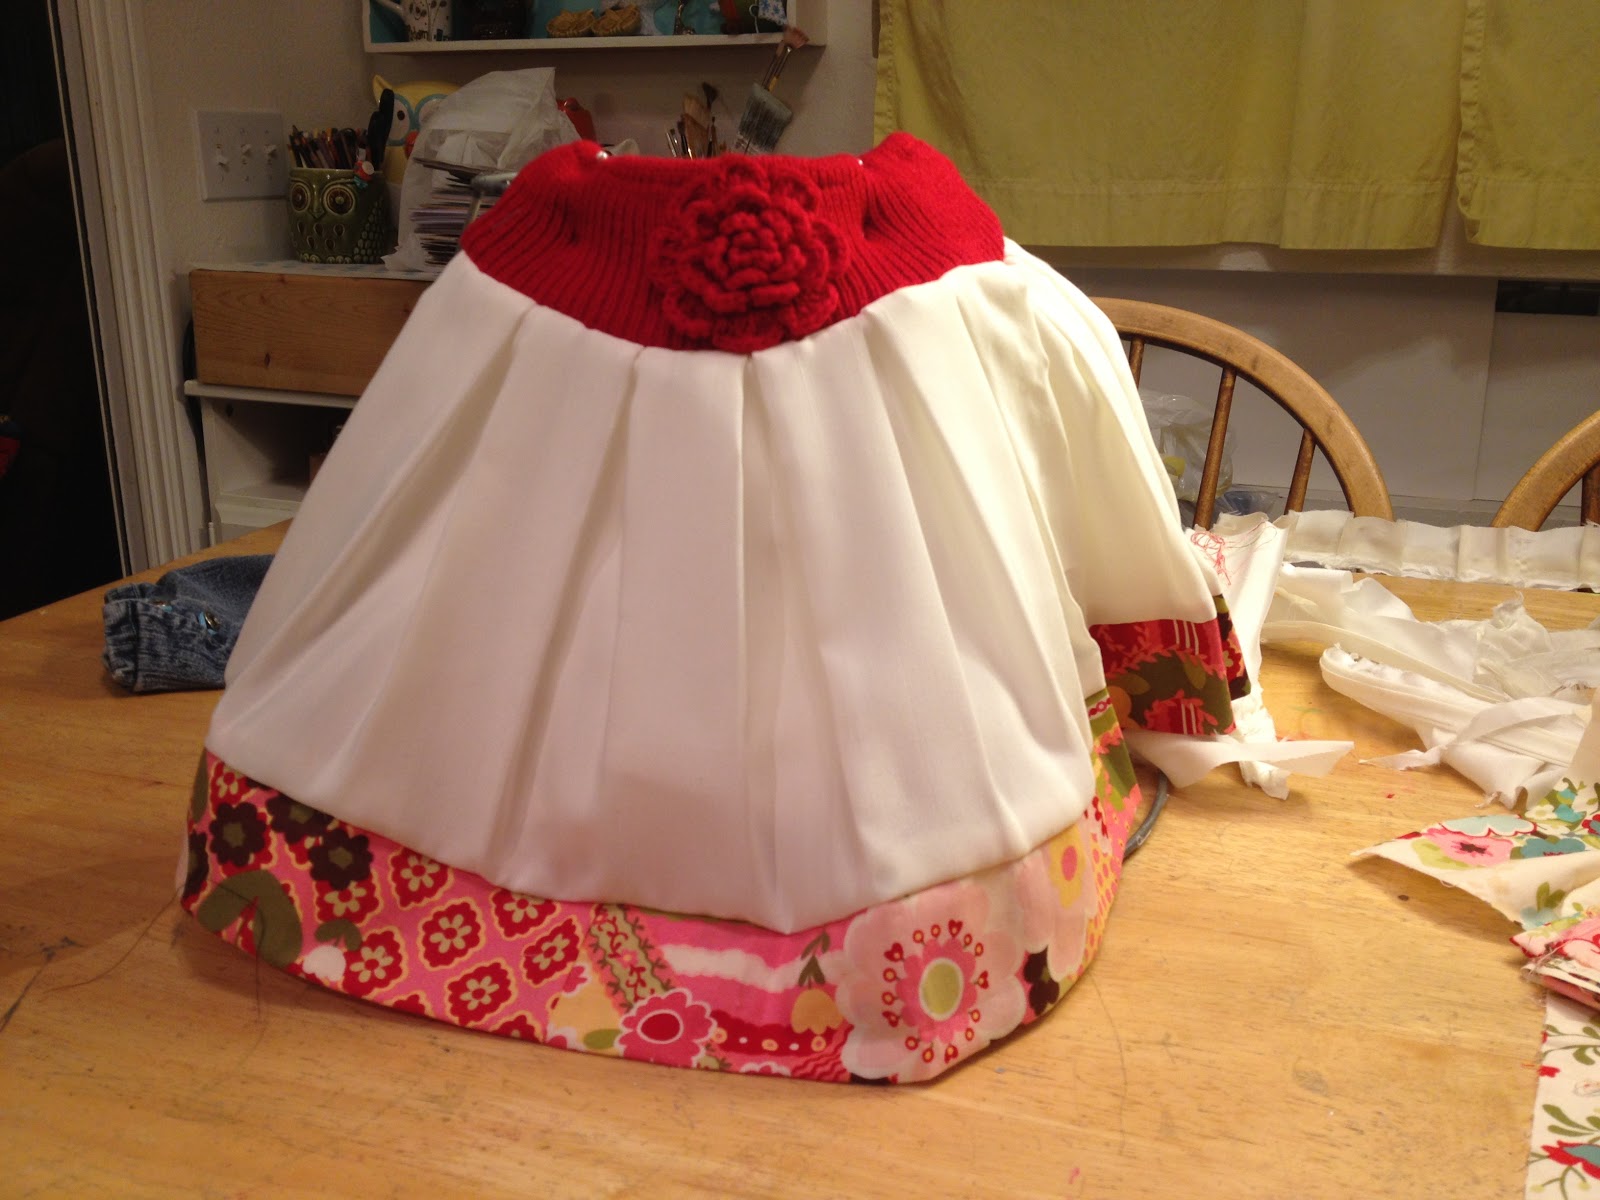
I cut a four inch strip of fabric to extend the bottom, folded it in half and sewed it to the bottom of the pleated portion of the skirt.


After getting halfway through prepping the pleated fabric I decided it was way too thin to not have a liner, so I went ahead and used the liner from the lamp and used the pleated fabric as a pattern.  Normally when I'm making a dress or a blouse or something that involves some kind of under collar with interfacing and a ton of extra little pieces that have to be sewn together that are more complicated than the main part of the garment, I will normally just turn it into a reversible garment.  After you have done a few it gets easier, plus it's like two outfits in one.  I'm also obsessed with enclosed seams, but more on that later.  Anyways, in the picture above I have placed both fabric pieces right sides together, most people might pin at this point....but we know how I feel about pinning.  Go ahead and sew the pieces together at the top where the waist will be.
 
 So here are the pieces all sewn together, I pinned the edges and did a seam up the side.  The lining just has a rolled hem, (a rolled hem is where you fold the fabric 1/4 inch, press, then fold another 1/4 inch, press and then do a straight stitch along the edge...I've never gotten it to work for a curved piece of fabric, like an A-Line skirt, suggestions anyone?  But it works pretty well with a straight piece of fabric.)  Once the seams were all together I folded the lining down and ironed the top into place, if it didn't need a waistband it would have looked like a completed skirt.
I found this headband in the dollar section at Target a few years ago and bought it for my daughter, thinking it was much smaller than it was.  It never fit her, so I tried it on her a few weeks ago and realized that it was about the right size for a waistband.  Perfect!
I pinned the headband to the top of the skirt and stretched the knit fabric while I sewed it to the cotton fabric.
It wasn't quite stretchy enough at the top so I ran a little bit of elastic through the top, using the hem as a casing.  Normally I would run elastic through a casing with a safety pin, but the casing was too small so I used an upholstry needle I had lying around.


So, in conclusion to this project, I would not normally suggest using the fabric from a lamp shade for a washable garment, who knows how it will hold up in the washer and dryer, I mainly did this because I was bored and I thought it might work.  The headband I would do again in a heartbeat, I think it adds a really fun detail, and in the future I will definately think twice before mixing such a vibrant red with a white fabric, colors tend to want to spread when the conditions are just right.  If they do and this ends up an epic fail I will be sure to tell you about it.  So, I hope you enjoyed the tutorial, keep your thinking hats on when you have a pile of would-be junk that you are thinking about getting rid of and happy crafting!!!

Friday, March 22, 2013

My Owl Obsession


Ok, so I admit, I have an addiction.  I'm not talking about crafting, I'm not talking about shopping, I'm talking about owls.  My collection has spiraled into an identity.  No longer can family and friends walk through a store, pass by an owl and not think of me!  I guess it's because I can relate to an owl.  He lurks around at night hunting unsuspecting prey in their sleep, I stay up all night pinning things on pinterest, those pins never had a chance!!! 


It all started a couple years ago when my mom and I went to a holiday craft show at the local high school, there he was, the coolest vintage owl night light I had ever seen just waiting there for me, and bonus, he was only three dollars!!!  So I snatched him up.  I put him on a table and there he sat, lonely for weeks.  He needed a friend, he needed a confidant, he needed purpose!  So what did I do?  I went shopping with my friend G. to The Uptown in Richland (totally worth the trip if you have a little imagination). 

Since that fateful day I have found owl after owl, I've received several as gifts, I'm constantly having pictures sent to my iphone and whenever someone sees a real owl on a telephone line or in a tree, I'm hearing about it.  So, next time you are out and about and see some kind of owly thing, just remember, I'm the one that made it cool!!!  Happy Crafting everyone!

Custer's Spring Arts and Crafts Show

This weekend is one of those that I wait for all year, the Custer's Spring Arts and Crafts Show!!!
Okay, so someone dropped the ball with the sign being half blown down but nobody's perfect right?

Left to Right:  Amber, Candy (AKA Mom) Kim, Slung baby Caden
Bottom Charlotte & Logan

Venders from all over Washington, Idaho and Oregon come here to sell their deliciously awesome homemade goods, here are a few highlights of our craft inspiring day!
 
Sweater Heads
Recycled Wool Hats


There's nothing I love better than upcycling...for those who aren't familiar with the term, I did not make it up, it is a word describing taking an item and making it into something more valuable and Leslie is certainly turning those frumpy old sweaters into something great.  Not to mention she's from Astoria Oregon, I have long had a love for that little seaside town (not to be mistaken for seaside just a few miles away) I think it makes me so nostalgic because of all those years watching goonies as a kid, "HEY YOU GUYS!"  Check out her shop, it's awesome!
 
Ted Ogilvie
jtogilvie@hotmail .com

 
Above is Ted, he had some awesome stuff in his section, my favorite were this little hotdog roasting sticks made from forks and golf club handles, I bought five for my hubby's birthday next month.  P.S.  That bench behind the roasting sticks turns into a table...WHAT?!!!  That's right, a table and bench combo!

Old Man's Pants
 
Please excuse the fuzzy picture, I should have taken a few to make sure I had a good one, but no matter, onward and upward.  I think one of my favorite things about this vendor was the name, not to mention the adorable hats!  I chatted with Andy (the hat-wearing man above) who said his wife designs all the hat patterns herself and that he does a lot of the sewing.
 
 I also loved their display, there's something about old suitcases that I just love!  It has that cool upcycled look that I am crazy about (there's that word again!).

 
As you can see in the hat above, these are hand made, unique hats made from old clothing, including old man pants apparently (thus their company name).  Check out their website, it is a definate must see!!!


I And A Designs


What caught my eye at first with this vender were these baroque style pincushions (we all know how I like a good pincushion). Frilly, girly and adorable, I wish I could have taken pictures of them but the vender is a little camera shy, but her sister had some great stuff too, sling purses, tortilla warmers and bedside caddies. A delightful little spot to check out with some great items!


There were a lot more venders that I liked, but I didn't think to take pictures for my blog until my kiddos were about spent.  I can't wait to see all these vendors again this summer at Art in the Park in Richland!!!


Thursday, March 21, 2013

The Three "Owlmigos"

So I couuldn't go to bed without giving you a little taste of the kinds of things this blog is going to be all about so I'm going to do a small tutorial on a cute little owl planter I found while thrifting with my good friend G.

Please excuse my terrible photography skills, it's something I'm working on.  So here they are, the three owlmigos in all their 70's glory.  Now, I've made a lot of pincushions in the past but this one proved to be much more difficult than the others I've made because of the awkward shape that you have to fit the cushion part into so I had to sort of wing it (pun intended). 


I started by sewing up the baisic shape of what the inside should have been by measuring the depth, width and height, I miscalculated horribly so it was much too big, but no matter, onward and upward, nothing a little pinning couldn't fix, I stuffed it with steel wool because I had read on someone else's blog that it sharpens your needles when you poke them through.


Fold and pin all the extra stuff (you can also sew it closed if you want to) I wouldn't consider myself a good crafter as much as a good enough crafter.  Pinning it was good enough for me!
 
 I stuffed my cushion into my nocturnal birds, fluffed it a little bit to make it not sag in places.  Note:  It won't sag if you put enough stuffing in it, I didn't feel like running to the store for more steel wool, good enough.
Here we have the owlmigos looking smug with their new look, there's more than one way to skin a cat, since I loved these owls and my tastes change so often I decided to make a cushion that I could change out, otherwise I would have pulled out the old hot glue gun and went to town, I'll show you how to do that in another post when I show you how to make a pincushion out of a teacup.
And there you go, one cute and completely original pincushion, now if only they had a secret handshake!  So here's your assignment for the weekend, go rummage at thrift stores, yard sales or your cupboards and find a cute dish or planter to make one of these for yourself.  Thanks for reading and happy crafting!!! 

Long Time Reader, First Time Blogger

Hi, my name is Amber and I am a collector of projects, some might even call me a projectaholic (see deffinition for hoarder).  In some ways I am a lot like my dad in this respect, I collect stuff that I might use some day for some project that I have in mind, carefully store it away somewhere accessible and then promptly forget about it.  Over some time it will be covered in dust, things will be stacked on it and eventually (much like a junk drawer) I will go on a cleaning binge months or sometimes years later, unearth it and think to myself, why in the world did I buy this?  I'll think about throwing it away, I'll pull it out where I can see it for a while, sometimes I will be inspired to do something with it, other times not.  So to feed the monkey on my back and to clear out my storage areas I have decided to create a blog following along with my journey to finally get around to all those projects I've been filing away for years.  I'll write out tutorials, take some pictures (although I am definately no photographer) and we'll see where this leads.  So for now, good night, and happy crafting!